Virtualization - OVA/OVF - ESXi Support/Extended OVA Customization

Recently, I’ve been working with nixos-generators, and initially encountered some pretty big issues when attempting to import virtual appliances (OVA files) into ESXi. These can be created with e.g. nixos-generate -f virtualbox.

This VirtualBox ticket comment details the issue I was experiencing.

When attempting to import an OVA (created with nixos-generate -f virtualbox) into VMWare Workstation, a “conformance check” error dialog is shown, but the user is given the option to retry with loosened requirements. I was able to successfully import the appliance after retrying with relaxed requirements.

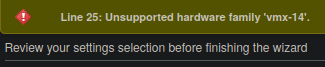
When attempting to import the appliance into an ESXi instance, however, an “unknown error” message is displayed, and the user is given no such option to try with relaxed specifications, preventing the appliance from using the appliance at all.

Here was my solution to this problem using the steps suggested by the aforementioned comment:

fixedImage = 
      let
        vmConfig = formattedImage.config.system.build;
        vboxImage = vmConfig.virtualBoxOVA;
        vboxName = vboxImage.name;
      in
      pkgs.runCommand "fix-esxi-image" {}
      ''
        mkdir $out
        tar -xvf ${vboxImage}/*.ova

        ovf=$(ls -1 *.ovf)
        mf=$(ls -1 *.mf)
        vmdk=$(ls -1 *.vmdk)

        sed 's;\(.*<vssd:VirtualSystemType>\).*\(</vssd:VirtualSystemType>\);\1vmx-14\2;;' -i nixos-20.09pre-git-x86_64-linux.ovf
        sum=$(sha1sum $ovf | cut -d ' ' -f-1)
        substituteInPlace $mf --replace "SHA1 ($ovf) = .*" "SHA1 ($ovf) = $sum"
        tar -cvf nixos.ova $ovf $mf $vmdk
        cp nixos.ova $out
    '';

Note that this relates to OVF version 1, as that is the default for the VBoxManage export command used in virtualbox-image.nix, and there does not seem to be an option to easily enable the --ovf20 flag that does not require e.g. a new option for said expression.

This solution has three steps:

  1. Extract the OVA file created by VBoxManage export (it’s just a TAR file)
  2. Change the VirtualSystemType attribute to vmx-14 (or whichever Virtual Machine Hardware Version is desired, e.g. vmx-17 for ESXi 7.0.0.
  3. Update the SHA1 hash in the mf file with the sha1sum of the modified ovf file (use SHA256 for OVF 2)
  4. Create a new OVA file with the updated files, ensuring the order of files is correct (e.g. the OVF file needs to be the first file in the archive)

This results in an appliance that can be imported into ESXi, and by extension, will not present any “conformance check” errors in VMWare Workstation.


When I was initially researching this issue, I kept finding descriptions on how to use VMWare’s ovftool to resolve this issue.

However, this tool is proprietary, and requires a login to download, in addition to being Windows-only. This was a blocker in generating ESXi-friendly image/appliances for NixOS (using nix).

Though this solution seems to work for me, I wanted to see what others involved with virtualization in NixOS think, and whether improved flexibility/customization for OVA/OVF files is something that could be addressed.
I also think it’s a bit too messy to just add to nixos/modules/virtualization as esxi-image.nix or similar.

Curious to see what others involved with virtualization on NixOS think, and if there might be a better solution, or other improvements we can make in this area.

1 Like

Update:
Now that cot has been merged, we can replace the command that modifies the VirtualSystemType with a much more succinct cot invocation:

Before:

  pkgs.runCommand "fix-esxi-image" {}
   ''
      mkdir $out
      tar -xvf ${vboxImage}/*.ova

      ovf=$(ls -1 *.ovf)
      mf=$(ls -1 *.mf)
      vmdk=$(ls -1 *.vmdk)

      sed 's;\(.*<vssd:VirtualSystemType>\).*\(</vssd:VirtualSystemType>\);\1${vmx-14}\2;;' -i nixos-20.09pre-git-x86_64-linux.ovf
      sum=$(sha1sum $ovf | cut -d ' ' -f-1)
      substituteInPlace $mf --replace "SHA1 ($ovf) = .*" "SHA1 ($ovf) = $sum"
      tar -cvf nixos.ova $ovf $mf $vmdk
      cp nixos.ova $out
  '';

After:

 pkgs.runCommand "fix-esxi-image" { }
  ''
    ova=${vboxImage}/*.ova
    mkdir $out
    ${pkgs.cot}/bin/cot edit-hardware $ova -v ${vmx} -o $out/nixos.ova
  '';
2 Likes

Hi, sorry for reviving this thread. I’m trying to get an ova image out of NixOS generators and have the same Unsupported hardware family 'virtualbox-2.2' error. I don’t even know where the pkgs.runCommand mentioned previously needs to go. Also, it would help me enormously if I had a complete working example. Especially for things like setting up the disk and network devices that end up in the ova.

I’m trying to use flakes btw.:

$ cat flake.nix
{
  inputs = {
    nixpkgs.url = "github:NixOS/nixpkgs/nixos-unstable";
    nixos-generators = {
      url = "github:nix-community/nixos-generators";
        inputs.nixpkgs.follows = "nixpkgs";
    };
  };
  outputs = { self, nixpkgs, nixos-generators, ... }: {
    packages.x86_64-linux = {
      virtualbox = nixos-generators.nixosGenerate {
        pkgs = nixpkgs.legacyPackages.x86_64-linux;
        modules = [ ./minimal.nix ];
        format = "virtualbox";
      };
    };
  };
}

$ cat minimal.nix
{ config, lib, pkgs, ... }:
{
  environment.etc."ssh/auth_principals/root".text = "admins";
  environment.etc."ssh/trusted-user-ca-keys.pem".source = ./trusted-user-ca-keys.pem;

  services.openssh = {
    enable = true;
    permitRootLogin = "no";
    passwordAuthentication = false;
    extraConfig = ''
      AuthorizedPrincipalsFile /etc/ssh/auth_principals/%u
      TrustedUserCAKeys /etc/ssh/trusted-user-ca-keys.pem
    '';
  };

  users.users.root = {
    initialPassword = "nixos";
    openssh.authorizedKeys.keyFiles = [ ./authorized_keys.txt ];
  };
}

I tried it like this, but have no idea what vmx is supposed to be or come from here:

$ cat flake.nix
{
  inputs = {
    nixpkgs.url = "github:NixOS/nixpkgs/nixos-unstable";
    nixos-generators = {
      url = "github:nix-community/nixos-generators";
        inputs.nixpkgs.follows = "nixpkgs";
    };
  };
  outputs = { self, nixpkgs, nixos-generators, ... }: {
    packages.x86_64-linux = {
      virtualbox = let
          unfixed = nixos-generators.nixosGenerate {
            pkgs = nixpkgs.legacyPackages.x86_64-linux;
            modules = [ ./minimal.nix ];
            format = "virtualbox";
          };
          #vmx = "vmx-17";
          vmx = "vmx-14";
        in nixpkgs.legacyPackages.x86_64-linux.runCommand "fix-esxi-image" { } ''
          ova=${unfixed}/*.ova
          mkdir $out
          ${nixpkgs.legacyPackages.x86_64-linux.cot}/bin/cot edit-hardware $ova -v ${vmx} -o $out/nixos.ova
        '';
    };
  };
}

$ nix build '.#virtualbox'
error: undefined variable 'vmx'

       at /nix/store/l4lgk7xgbxg8hn1vmcm3q1sibz4h3rcd-source/flake.nix:21:58:

           20|           mkdir $out
           21|           ${nixpkgs.cot}/bin/cot edit-hardware $ova -v ${vmx} -o $out/nixos.ova
             |                                                          ^
           22|         '';

If I just set it to vmx-14, I get

image

same for vmx-17 btw.

Edit:
Found a hardware type vmx-09 that worked, now this comes up:


Which is probably the virtual sound card.

And once I got that sorted out audio = "none"; audioout = "off";, it complains about the storage controller
image

Yeah… VMWare is always fun.
See this list for a matrix of VMware products and their virtual hardware version

Try using whatever is supported by your hypervisor environment.

e.g. vmx-13 for ESXi 6.5

Yeah, as I said, it doesn’t complain about vmx-09, but every time I find a working setting for some property, the hypervisor find a next thing to complain about. For people interested, I also opened a github issue: Unsupported hardware family · Issue #128 · nix-community/nixos-generators · GitHub

FYI, posted the “solution”, I ended up using in the issue linked above.

(and learned in the process, that nixos reabuild has a couple of problems and --user-remote-sudo doesn’t really work, which lead to this abomination when trying to update the deployed system: NIX_SSHOPTS="-i /home/confus/.ssh/id_rsa -o IdentitiesOnly=yes -o StrictHostKeyChecking=no -o UserKnownHostsFile=/dev/null -t" nixos-rebuild switch --flake '.#somesystem' --builders '' --target-host <user>@<ip> --use-remote-sudo)